Blue Crabs

For a farm girl, I’m inconsistently squeamish about killing things. Flies in our house are caught with a cup and freed outdoors, but roaches are mercilessly squashed. Ants might be allowed to roam across counter tops for days, then tortured to death with  poison from traps placed in strategic corners. Meat from sentient creatures such as cows, goats, and chickens is consumed with abandon . . . and I can’t put a live crab in boiling water.

The crabs caused a lot of trouble a couple of weeks ago, when Walking Fish, our CSF (Community Sponsored Fishery), let us know that North Carolina blue crabs were in the next delivery.

I’d been avoiding the crabs, and apparently so had many other Walking Fishers. Originally, members were simply told that crabs would be arriving as part of their weekly share; those who didn’t want the crabs could write to the group’s e-mail list and arrange for an exchange with another member. But it seems there was so much switching around, and too many crabs not being taken, that Walking Fish changed the policy. Now, when crabs come in, those brave enough to face them down have to add their names to a list.

Fred wanted to be on that list–the list of mighty crab killers. Why remains a mystery, but it is probably the same impulse that propels him–my sensitive, bookish artist–to yell at hapless pitchers and treat interstate on-ramps like entryways to the Indy 500.

“Will you just have it all done when I get home?” I pleaded.

“Sure,” he said. Perhaps it was my imagination, but his chest puffed out the tiniest bit. “I’ll look up how to do it on the internet.” 

That should have been my first warning.

As usual, he picked me up from work on Thursday.

“How are the crabs?” I asked.

He couldn’t seem to look at me. His head drooped. “It was awful,” he said. “I couldn’t get any meat out of them. I tried and tried and I got just enough to put on a cracker.”

Confused, I asked, “What do you mean there was no meat?”

“There was just this watery stuff, mostly, and then I couldn’t get the meat to pull away from the shells.”

I pondered this. “That’s odd.”

Then it came to me. “Did you cook them before you tried to get the meat out?”

He looked up, and the life drained from his eyes. “Cook them? The internet instructions didn’t say anything about cooking them first.”

At moments like these in married life–like when the Braves lost to the Giants in the playoffs, or when a man struggles with assembly instructions you figured out an hour ago–it is important to be gentle. “Honey, I think you need to cook them first.”

He put his head in his hands. “But the instructions didn’t say anything about cooking them first. They just talked about cleaning them. I thought it was like fish, or chicken. You know, you clean it, then you cook it.”

I put a hand on his shoulder. He looked up again, despair clouding his face. “Why didn’t they say anything about cooking them first?”

Now is probably not the time to mention crab boils, I thought, or all the stories you hear about cooking live crabs, or children’s movies like The Little Mermaid, which admittedly Fred probably never saw. Instead, I patted his hand.

“We can probably salvage something,” I said. “I’ll take a look when I get home.”

“I don’t know,” he moaned. “There really isn’t much there.”

I figured he was exaggerating. Unfortunately, he wasn’t.

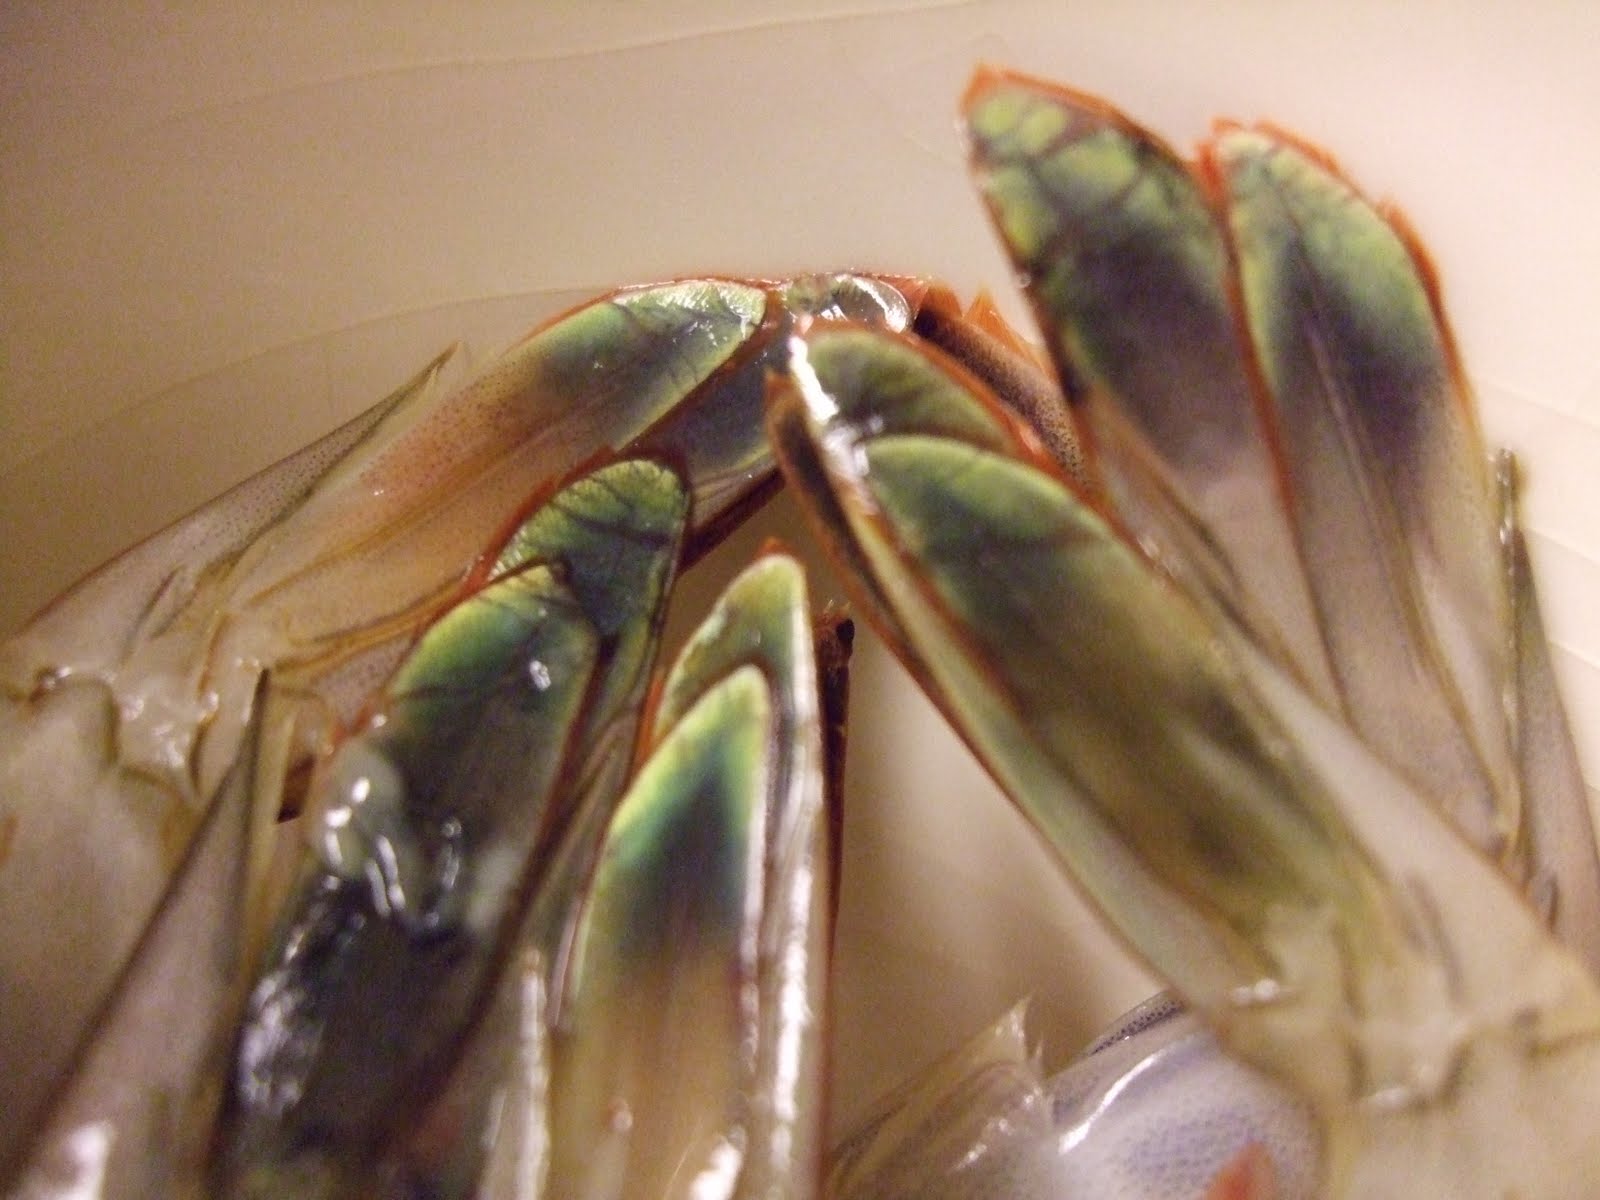
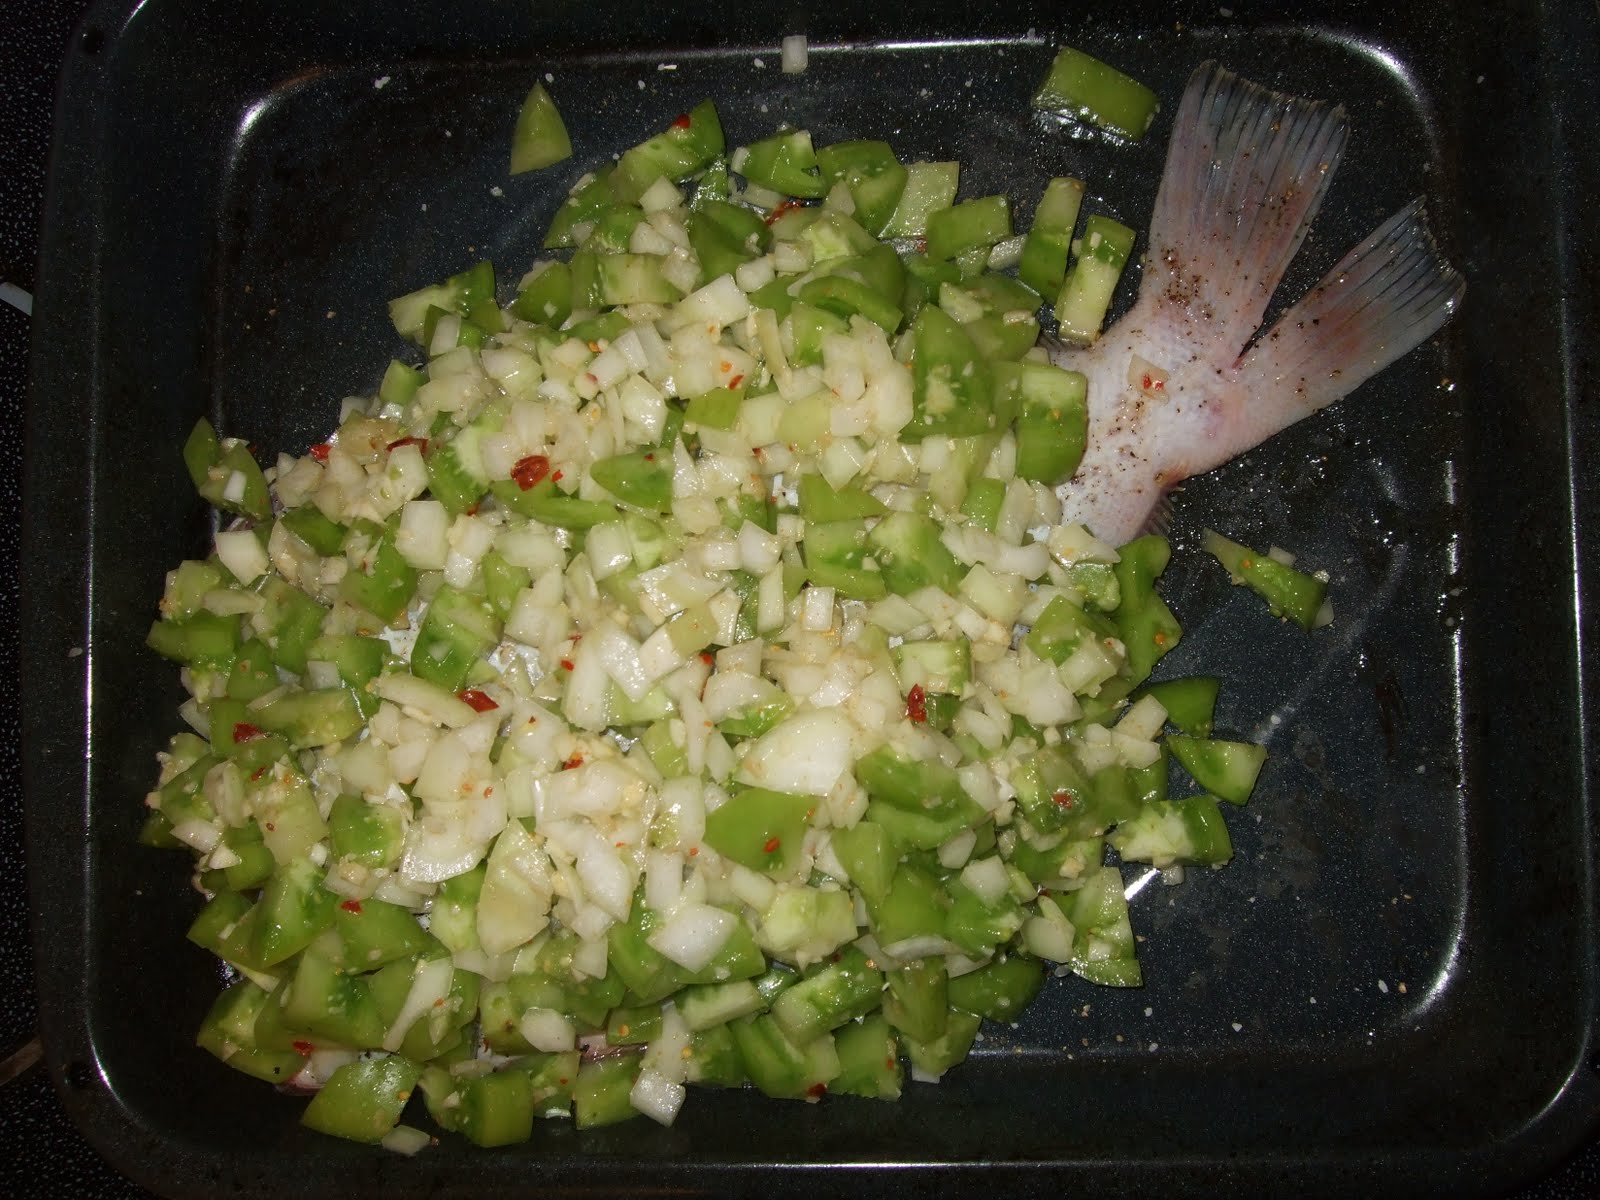
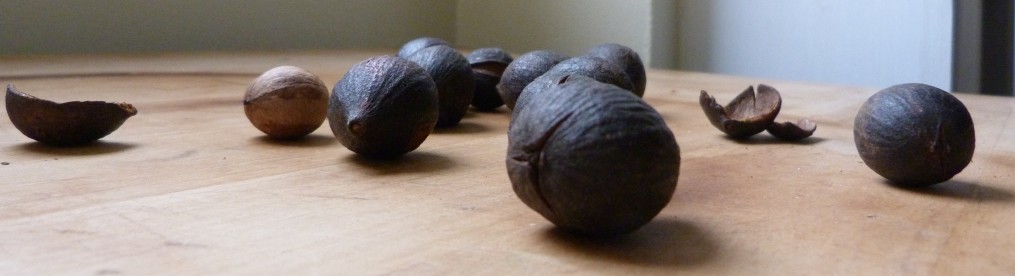
If you’ve ever wondered how much meat you can get from six blue crabs without cooking them first, here it is.

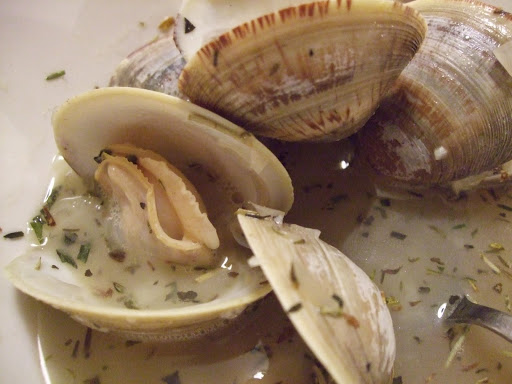
Luckily, Fred stopped his cleaning efforts before he got to the claws. We boiled the carnage, seasoning the water with herbes de Provence and salt. We made an appetizer of the meat we salvaged. It was sweet and tender, possibly the best I’ve had.

Fred’s been pondering the meaning of this incident ever since. He’s wondered how many times, at 50, he’s missed critical first steps. He’s even considered the crabs as a metaphor for his whole life.

That may be true. If so, then it’s also true that a few good things can be salvaged from a mess. And that we’ll get another shot at the crabs, if we want.

Everything’s Better with Bacon

A few weeks ago I went to the doctor for my sort-of-annual check-up. “Your cholesterol levels are amazing,” she raved. “Your overall number is a bit over 200, but it’s because your good cholesterol levels are so incredible. I just don’t see this very often.”

I felt as smug and self-satisfied as I did at age six when I was the first student in Mrs. Hyberger’s class who could read from the “Dear Cubby” page in the textbook. I hadn’t worked very hard to learn to read–it just happened. And certainly I haven’t worked very hard to lower my cholesterol levels. It’s just my natural ability, I thought. My innate talent. A special gift.

I’m celebrating by eating bacon. With my cholesterol levels, why should I worry about it? And it certainly keeps Fred happy. (Miraculously, his cholesterol levels are excellent too.)

The bacon has been a surprising boon to the the fish we’ve been getting from our CSF (community-sponsored fishery), which is in the middle of its fall season.

 Mullet

Flounder

As usual, we’ve gotten some beautiful fish, but the flavor has been unexpectedly strong in some cases. There’s no funky smell, but when cooked the fish was briny and earthy all at once–in other words, too fishy even for my taste.

In desperation, I turned to some of the recipes provided by the fisheries themselves. I had my doubts about these recipes, which relied heavily on bacon and cream and baked the fish for what seemed like far too long. It didn’t make sense to me. Why smother fresh-caught fish with other flavors? But after trying to face down some of these powerful creatures with mere lemon juice and garlic, I’ve come to accept the wisdom of attacking them head-on with pork and cream. This technique mellows the pungent flavor of fishy fish without covering it up completely (though covering that flavor would be a miracle on par with Fred choosing to eat a salad over a steak).

It also turns out the somewhat longer cooking time is necessary when the fish is all together in a casserole dish–laid close together this way, the fish take a bit longer to heat up than they do when separated into individual pieces. Just be sure to check for doneness frequently to avoid overcooking.

Fish with Bacon, Onions, and Cream
Serves 4

1/2 – 2 lbs white fish (you can use fish that is headed and gutted but not filleted, but you will have to watch for bones)
6 slices bacon, cut into 1″ pieces
1 large onion, cut in half and sliced
Cream or half and half (enough to partially cover fish in when spread out in a casserole dish)
About 1 tbsp. sage (optional)
Chopped chives for garnish

Preheat oven to 350. Generously salt and pepper fish and place in a casserole dish large enough to hold pieces without layering. Cut up bacon. Place in large skillet and fry on medium-high heat. Cut a large onion in half and then slice thinly. When bacon is cooked about halfway, scatter in onion and saute until translucent. Pour over fish. Pour a mix of cream and half and half, or just half and half, over fish until bottom of pan is covered and cream covers fish partway. (Unless you pour off the bacon fat, I suspect that using cream alone would make the dish too heavy.) Sprinkle sage over fish, if desired. Cover dish with lid or foil and bake until fish is tender, anywhere from 10 to 30 minutes depending on the individual size of the fillets. Check frequently for doneness to make sure fish does not overcook.

Remove fish from oven. If fish is not filleted, remove the bones as best you can. To do this, gently scrape off the top layer of flesh with a large fork, then peel out the spine and ribs and discard. You won’t get all the bones, but you’ll reduce some of the hassle of removing them at the table. Plate fish and spoon generous amounts of sauce and onions over the top. Garnish with chives and serve.

Shrimp, Corn, and Squash Soup

Nothing makes me crabbier than fall. That cheerfully crisp weather, that can-do spirit that forces you off the porch and into some useful activity–it’s all too horrible to contemplate for very long.

This year, though, good news has buoyed me up, helping me to face fall’s dreadful enthusiasm with a sense of hope: The Louisiana shrimpers are headed out into the Gulf again.

For me, the Gulf oil spill has loomed all summer like . . . well, like the black oily cloud it is, seeping into the fragile marshes, threatening the livelihoods of shrimpers and fishermen even more than cheap seafood from China, oozing into delicate marine life and causing damage we may not fully realize for years. Still, earlier this week the shrimpers were out on the water again. They didn’t catch much. But there’s a little hope.

To celebrate, I’m offering this soup recipe that I developed at the beach, using these gorgeous shrimp from the North Carolina coast, caught the same day they were served. Fred’s little camera doesn’t begin to do them justice.

This dish is a lot less complicated than it looks. If you can boil water, you can make the shrimp stock, and it cooks while you prepare the other ingredients. Besides, there’s almost no way to mess up the combination of fresh corn, squash, and shrimp–a hearty yet delicately flavored combination that may well be the perfect summer dish, just in time for summer to end.

You can, of course, cheat by using frozen shrimp and corn and substituting water or chicken broth for the shrimp stock. But you’ll regret it. And you need to help the shrimpers get back out there.

Shrimp, Corn and Squash Soup

Serves 6

Kernels from 6 shucked ears of fresh sweet corn (do not substitute frozen)
6 small to medium yellow crookneck squash, quartered lengthwise and sliced (may substitute 1 – 2 small zucchini for 1 – 2 of the squash for added color)
2 tbsp. olive oil or butter
1 large onion, chopped
2 cloves garlic, minced
2 fresh jalapenos, minced (optional)
1 lb. large fresh shrimp, peeled, deveined, and cut into 3 pieces each; shrimp peels and tails set aside in bowl
Water
1 15 oz. can evaporated milk
Salt to taste

Begin by making the shrimp stock. Place shrimp peels and tails in medium saucepan. Add enough water to cover by about 1 inch. Bring to boil on high heat. Reduce heat to medium low and simmer for about 20 minutes. Drain stock into bowl, discard peels and tails, and set aside.

While stock is boiling, sauté onion in olive oil in large pot on medium high heat until translucent. Add garlic and jalapenos and stir. Add squash and sauté until tender, about 5 – 10 minutes. Remove from heat. Pulse in food processor until very finely chopped. Return to pot. Add corn. Cover with shrimp stock and increase heat to high; add water just to cover if there is not enough stock. Bring to boil; reduce heat to medium low. Add evaporated milk, cover, and simmer until corn is tender. Cooking times can vary significantly depending on the type of corn you use, anywhere from 5 to 30 minutes; taste periodically until the corn is tender but not starchy. When corn is cooked, reduce heat to lowest possible flame. Add shrimp and cover; cook about 3 minutes or until shrimp are cooked.

Red Turnips, Scallops, and Pasta

I continue to grovel for nearly killing Fred last week, and yesterday some some scallops offered a chance for redemption. (They came from Walking Fish, our community sponsored fishery, which I’ve raved about so much in this blog that they need to start paying me.)

My first thought was to serve them over pasta, with a side salad that included this bunch of red turnips, picked up at the Durham Farmers’ Market on Saturday and so in desperate need of eating.

The turnips are white on the inside, laced with red, and with a thick scarlet ring around the edge when sliced. They would have been beautiful in a salad, especially with their greens mixed in. Unfortunately, though, they tasted like–turnips. Really sharp turnips. So cooking was in order, and I considered serving them mixed with the scallops.

But I dispensed with this idea when I saw the scallops, just a few hours out of the ocean.  They were everything you hope for in a scallop–sweet, buttery, tender little pillows that needed only a quick visit to the skillet. They deserved star billing, not to be sullied by any association with pasta or, God forbid, turnips.

Thus the turnips, with their greens, ended up on top of the pasta. The idea was inspired in the vaguest sort of way by a visit to Liguria, Italy, in 1994, when I first had potatoes and pasta with pesto–the moment I came to understand that anything, even another starch, could be served pasta and it would be good.

My scallop technique comes from Cook’s Illustrated’s book The Best Recipe, though really the only technique you need for scallops is not to overcook them. The recipe includes a nice sauce made from the pan juices, and it occurred to me that a variation on that sauce would be good with the turnips. (“Variation” may be the wrong word here, since I left out everything in the recipe except butter, white wine, and parsley and added turnips, garlic and turnip greens.)

The meal below looks more complicated than it is. I’ve written out the recipe in some detail because the timing is critical–but the whole thing took only 30 minutes from the moment the ingredients came out of the refrigerator.

And it’s worth it. Fred declared this one of the best meals we’ve had–though he thought the addition of sausage might help. Only the fact that I put him in the emergency room last week kept me from killing him right there.

Scallops, Red Turnips, and Pasta

Serves 2

Scallops
14 medium to large scallops
1 – 2 tablespoons butter
Salt and pepper

Turnips and Pasta
6 small red turnips, washed, greens and ends trimmed, sliced into 1/2″ wide strips
Greens from turnips, stems trimmed, washed, dried, and cut into 3″ wide strips
2 large cloves garlic, minced
1 – 2 tablespoons butter
1/2 – 1 cup white wine
Fresh chopped parsley for garnish (about 1/2 cup)
1/2 lb penne pasta
Butter and salt for pasta

This recipe goes quickly once you begin cooking, so it is important to have everything ready.

1. Prepare vegetables and set aside.
2. Set scallops out on a plate and salt and pepper to taste. Set out additional clean plate, with foil to cover, for cooked scallops.
3. Put salted water for pasta on to boil. (Follow package directions.)
4. Heat large skillet on medium high heat for about 2 minutes. Once skillet is heated, add butter and swirl until bottom of skillet is coated. Cook until butter is lightly brown, a few minutes.
5. Add scallops quickly, one at at time. Cook for 1 minute. Turn individually and cook for an additional minute. You want to undercook the scallops a bit, as they will continue to cook a little on the plate. Turn off heat and transfer scallops to plate. Keep in warm place until ready to serve. (Covered on top of or near the stove is fine, or in a warming tray on the lowest possible heat.)
6. Watch the pasta water while you are preparing the other ingredients and add pasta to water once it comes to a boil. Cook according to package directions and keep an eye on it so it doesn’t overcook. When pasta is done, drain it, return to cooking pot, add butter and salt, and cover until ready to serve.
7. Return heat on skillet to medium. Add 1 – 2 tablespoons butter until melted. Add wine, enough to cover bottom of the pan, and scrape bottom to remove brown bits. Add turnips and salt to taste. Cover and cook until just tender, about 5 minutes.
8. Add greens. Cook an additional 2 – 3 minutes, covered, until greens have just wilted.
9. Remove lid from turnips and continue cooking just a few minutes more. Serve turnips over pasta and garnish with parsley, with scallops on the side.

Shrimp!

We have received some gorgeous shrimp from our CSF, which much to our dismay made its final delivery for the season on Thursday.

I especially love the green tints in the tails. Fairy wings must look like that.

The bounty of shrimp has led to a recent cooking extravaganza. In preparing them, I’ve referred to an old and dear favorite of Southern cooks, Charleston Receipts, for ideas. My copy, the 1973 edition, was snatched from the jowls of death while I was in college, grabbed from a pile of cookbooks a family friend was tossing out.

It’s easy to see why a suburban housewife would not want this filthy thing lurking on her tidy shelves. The cover isn’t even physically attached anymore. Still–how could someone throw away a book with 28 “receipts” featuring shrimp?

I’m quite fortunate to have help whenever we cook shrimp. Louise waits patiently in this exact position throughout the process, ready to clean up any stray bits that might happen to fall on the floor.

(Note: Those hideous Birkenstocks with socks are reserved solely for the home. I am more embarrassed than Tiger Woods at this unexpected revelation of my secret life.) 

Neither of these recipes comes from Charleston Receipts, exactly, but some of those dishes served as inspiration. You’ll note these two dishes are very similar–we had fresh jalapenos to use up!

Shrimp with Black Eyed Peas

This dish was actually better the next day.

Serves 4 as a main dish supper or 6 as a pre-dinner soup

2 tbsp. olive oil
1 large onion, chopped
1 medium jalapeno, minced
2 large cloves garlic, minced
1 lb. black-eyed peas
6 cups or more water
2 medium bay leaves
Kosher salt to taste
1 1/2 c. crushed tomatoes (canned)
1/4 c. flour
1/2 c. half and half or milk
24 medium shrimp with tails

Heat olive oil in large pot over medium high heat. Saute onion and jalapeno in oil until onion is translucent. Add garlic and stir. Add peas with enough water to cover them by an inch or two. Cover and bring to a boil over high heat. Reduce heat to low (but high enough to keep liquid at a simmer). Add bay leaves, salt, and tomatoes. Cook, covered, for about 45 minutes or until peas are tender, stirring occasionally. Add water as needed to keep peas covered. (Bring to a boil again if you add water, then reduce heat back to low.) Once peas are tender, whisk together flour and cream until flour has completely dissolved and no lumps remain. Add to peas and mix thoroughly. Add shrimp. Cover and cook for a few minutes until shrimp has turned pink, stirring frequently to keep sauce from sticking. Serve with rice or cornbread.

Shrimp with Black Beans and Rice

Serves 2

2 tbsp. olive oil
1 c. chopped onion
1 jalapeno, minced
3 -4 cloves garlic, minced
2 tsp. cumin
1 tsp. coriander
1 1/2 c. water (approximate)
1/2 c. dry brown rice
Salt to taste
1 bay leaf
1 1/2 c. crushed tomatoes
1 can black beans
Half and half or cream

Heat olive oil in large pot over medium high heat. Saute onion and jalapeno in oil until onion is translucent. Add garlic and stir. Add cumin and coriander and stir. Add water, rice, salt, bay leaf, and tomatoes. Bring to a boil over high heat. Lower heat to a simmer; cover and cook until rice is tender, about 40 minutes. Add beans and cream and cook until beans are heated, a few minutes. Add shrimp. Cover and cook until shrimp is pink, 4 – 5 minutes. Serve with cornbread.

Clammy Disaster

Fred and I received some beautiful clams from our CSF yesterday. We’d made a wonderful recipe with them just a few weeks before, simmering them in white wine, shallots, garlic, and a bay leaf, adding fresh parsley and butter at the end. Here’s how that dish turned out.

But yesterday we were out of white wine, and I’d just gotten the last of some pre-frost jalapenos from a colleague’s garden. So I decided to improvise and make a spicy broth.
We had red wine, beer, and turkey broth to serve as possible broths. I chose the beer, an India pale ale, thinking it would be the best complement to the jalapenos. I added shallots, garlic, a bay leaf, and some diced potatoes, bringing the ingredients to a boil and cooking until the potatoes were tender. All was going well. Everything smelled fine, a nice robust simmer of shallots, garlic, and jalapeno. I tasted a potato piece or two–they were tender and tasty enough.
Then I added the clams. Without washing them.
Fresh clams are not a regular part of my repertoire. I’ve opened plenty of cans and made a quick linguini dish with them, but I’ve rarely been willing to spend the money for fresh. I’m also a bit squeamish about cooking things that are still alive. So perhaps I can be forgiven for forgetting that clam shells are covered in an invisible grit. Invisible, that is, until it has sloughed off into your broth.
After the clams had steamed for about six minutes and were all opened, I ladeled them into bowls, poured the broth over them, and proudly presented them at the table. We dug in.
Fred took the first bite. This is sometimes followed by an exclamation of, “Honey, you are an excellent cook!” or “Wow!” He is very easy to please. There were no comments this time.
I scooped a clam from its shell. It was tender though not as flavorful as our earlier batch. I speared a potato. It was not obviously bad, but it lacked a certain richness. Then I tasted a spoonful of the broth.
Fred was eating silently, seemingly content. I wrinkled my nose.
“This is disgusting!” I exclaimed.
Fred put down his spoon. “I thought I noticed a metallic taste,” he said.
That comment proves without a doubt that Fred is a saint. The broth tasted like liquid tin foil, with sand added for texture. The jalapenos contributed a spicy note.
“We can’t eat this,” I said. “It’s awful.” 
Fred looked relieved. I suspect he would have eaten the entire bowl without complaint. I picked the bowl up and carried it away. He dove in to his salad. 
Not wanting to throw out an entire batch of fresh clams I drained off the broth, noticing that it was the color and consistency of a dirty pond. I rinsed the clams and potatoes multiple times. I took out the turkey broth–prepared over Thanksgiving–from the freezer and made a quick soup with onions, garlic, butter, more potato, herbes de Provence, thyme, bay leaf, pepper, and cream. I added the clam/potato remains back in and served it back to Fred, who had temporarily retreated into the study to look at Facebook–perhaps hoping to forget the horror of what he’d eaten earlier.
The soup was edible if not spectacular. We were able to determine that the metallic flavor actually came from the beer–I’m not sure why, since I’ve made beer-based dishes before without that effect. Fred thought it was the particular characteristic of an India pale ale, but we may never know for sure.
And the potatoes still tasted like tin.

Flounder with Green Tomatoes and a Radish Salad

Seasonal cooking is ideal for the easily bored: if you don’t eat some things all the time, you get the chance to appreciate them anew every year.

Right now, we’re appreciating green tomatoes, as well as radishes, turnips, and their accompanying greens.

At $2.00 – $2.50 a bunch, these radishes from the Durham Farmers Market are costly little beauties. So I suggest you use every last bit and add the greens to a salad. I posted a simpler recipe for radish salad back in the spring, but the dressing here has a little more heft and can stand up to fall’s richer foods.

Radish Salad (Makes 2 large salads)

4 cups cleaned and dried radish and/or turnip greens, torn into bite-size pieces
6 radishes or small white turnips, thinly sliced

Dressing

1 tsp. olive oil
3 tsp. white wine vinegar
1 tsp. brown mustard
1/2 tsp. honey
Salt and pepper to taste
1 small clove garlic, crushed or grated with zester

Whisk dressing ingredients together. Toss with greens to coat; add more salt and pepper if desired and toss again. Top with radishes and serve.

As for the green tomatoes: Every decent Southerner knows that you’re supposed to slice them and fry them up in bacon fat. But my fried green tomatoes are often abject failures– slimy green discs with bits of charred breading sliding across them. So I’ve turned to other methods.

Green tomatoes, it turns out, are wonderful accompaniments to fish. Their tart, citrusy flavor is perfect with any mild white fish that you’d pair with lemon–like this beautiful flounder from our CSA.
 

Baked Flounder with Green Tomatoes
1 whole flounder, 1 – 2 lbs, headed and gutted, skin and tail on
4 cups chopped green tomatoes
1 medium yellow onion, chopped
2 extra large cloves garlic (ours came from the Durham Farmers’ Market)
1/4 c lemon juice
1 tsp. red pepper flakes, or more to taste

1/4 cup olive oil

Kosher salt and fresh ground pepper to taste

(Special Note: If you are The Cat, pretend that you do not want to wrestle the flounder to the floor and gnaw its bones. )

Preheat oven to 350. Lay flounder in broiler pan. Brush with enough olive oil to coat fish. Salt and pepper both sides. Stir together remaining ingredients together in large bowl. Pour over fish.

Cover with foil and bake for 20 – 30 minutes. To serve, scrape top layer of fish from bone, set on plate, and cover with tomatoes. Peel off bone and serve remaining fish. Be sure to let a piece or two fall to the floor so The Cat can take it with dignity.

CSF Saves Griller

The CSF previewed on this blog over the summer has arrived, and it is delivering great happiness to our home. Called Walking Fish and started by a group of Duke students at the Nicholas School, it is now delivering fish caught by North Carolina fishermen to members once a week. (Shares are sold out; watch the site for opportunities for next year.)

CSF stands for “community sponsored fishery.” It works much like a CSA (community sponsored agriculture), in which you purchase a “share” in advance and receive weekly deliveries. (We pick ours up at the Sarah P. Duke Gardens.) The advantage for the fishery is that they are guaranteed a certain level of income. The advantage for us is fresh fish at a decent price. For $11.67 per week, Fred and I receive between 1 and 2 pounds of fish, or roughly $7.78 per pound.

Fred forgot to pick up the first week’s delivery, but I have begun to forgive him. After that disaster, however, we have so far received shrimp, yellow-bellied spot, and mullet

which we prepared like this

The side dishes are mashed potatoes with roasted squash, zuchhini, onion, and tomatoes. But those are unimportant. The important thing here is that the fish is GRILLED–deliciously, beautifully, wonderfully grilled.

My days of embarassingly inept grilling may be drawing to a close. Thanks to a Saturday spent watching my friend Bebe, an expert griller, prepare salmon, I quickly discovered a painfully obvious reason for my failures.

I was excited when Bebe invited me over for fish one Saturday, and even more excited when I realized I’d have a chance to watch someone who knew what she was doing work the grill. I had planned to watch her technique closely: how she laid out the fire, whether or not she covered it, how much she opened the vents once lid was put on.

I stood in her backyard, wine glass in hand, ready to take notes as she gathered her charcoal and implements.

“I’m really glad I have the chance to watch you do this,” I said. “I just can’t figure out why I can’t get my food to cook right on the grill.”

“Well, there’s nothing to it,” she said. (All grillers say that, but if there were nothing to it, poor Fred would not have suffered through multiple servings of simultaneously charred and raw steaks.)

“Maybe for you,” I said, and blathered on as I watched: “I wonder if I’m putting the lid on too soon? Oh–I see you’re opening those vents underneath. I do that too, but it doesn’t seem to matter. And you’re using self-lighting charcoal–well, we can’t do that with our grill because it has the option of using a propane tank to light the charcoal and if we ever want to do that we can’t use the self-lighting grill or we’ll blow ourselves and the entire neighborhood sky-high.”

Then she put a pile of charcoal on the grill. A big pile.

“You use THAT MUCH charcoal?”

“Yeah, you need to make a pretty big fire. And it needs to get hot–wait until the flames die down and all the embers are red.”

Oh.

So for the mullet, I got me a big pile of charcoal–roughly three times what I’d been using before. I completely filled that damn starter and fired ‘er up. And the mullet was great.

Scenes from the Sea: CSF and Tom Robinson’s Seafood

Unbeknownst to me, my recent quest for octopus started with a meeting at Duke’s Nicholas School of the Environment. The event, sponsored by DukeFish, was a focus group on the possibility of starting a CSF (community sponsored fishery) in Durham. A CSF works much like a CSA (community sponsored agriculture), in which individuals purchase a “share” in a farm for a summer and in return get vegetables delivered every week. (Duke’s Mobile Farmers Market offers this option.) Think tuna and shrimp in your weekly box instead of squash and tomatoes.

I signed up for the focus group the second I heard about it and persuaded poor Fred to come along with me. Not realizing that the event had been organized by graduate students, I was lured by visions of free wine and product samples–crab dips with water crackers; sushi rolls; smoked salmon with capers, onions and heirloom tomatoes; seared tuna slices drizzled with organic olive oil and sea salt.

When we arrived, about five minutes late, the graduate students had already decimated the hummus, vegetable tray, ranch dressing, and pita bread to cobble together their pitiful suppers. Fred and I picked up some baby carrots and a few stray red pepper slices, scraped the remaining hummus from the tray, took our water bottles, and sat down.

Still, the group was interesting and the conversation productive–especially for me, since it led to the discovery of Tom Robinson’s Seafood in Carrboro.

As we discussed the possibilities of the CSF–the graduate students stuffed with pita bread, the rest of us trying to ignore the rumblings of our stomachs as they mulled over the carrot scraps– we agreed that it wasn’t easy to find fresh and reasonably priced seafood in Durham. “Except for Tom Robinson’s, of course,” said one participant, “which is the only place I can get sushi-grade fish. And it’s in Carrboro.”

Tom Robinson’s? Was it possible there was an alternative to $23/pound sea bass at Whole Foods and tired, mushy, dried-out supermarket offerings? I turned to Fred.

“I gotta talk to this guy after the meeting,” I whispered.

A desperate look came into his eyes. “Aren’t we going to get something to eat?” he croaked.

Fred often says he’s a simple man. He’s right. I knew exactly how to handle this one. “We can go get a pork sandwich at the Federal after this,” I wheedled.

The desperate look disappeared and was instantly replaced by hopeful anticipation. I knew I’d get however long I needed.

It turns out that the other participant was a writer for the wonderful blog Carpe Durham, and he lived in our neighborhood. Tom Robinson’s, he explained, was a little place, but the owner traveled to the coast once a week and brought in fresh seafood. There was usually a pretty good variety, and prices were reasonable.

Just a week or so later, the Octo-Pie project under way and no octopus to be found in Durham, I found myself giving them a call.

“Do you have octopus?” I asked.

“Yes,” said a Spanish-inflected voice on the other end. “But it’s frozen. Not fresh. Is that okay?”

You have the only octopus between here and somewhere in the mid-Atlantic and you’re asking me if it’s okay if it’s frozen, I thought. “That’s fine,” I said. “How do I get there?”

I drove down 15-501 from Durham, wended my way through Chapel Hill’s achingly slow and self-righteous traffic, smug in its care for pedestrians and conservation of our natural resources, and turned left on Roberson Street in Carrboro.

I would have missed the building had it not been for a small sign reading “Fresh Fish” stuck in the grass next to the street. Next to the sign was a small white cinder-block building, in a white gravel lot, looking very much like it had been lifted up from a little sea town in the Bahamas and plopped down in the middle of Carrboro.

Walking in to the building through the screened door, I saw just two medium-sized coolers and a stainless steel rack with a smattering of condiments. A Japanese family was pointing at the contents, speaking to each other in their native language, and apparently deciding what to order. The Japanese are very picky about their fish, and when they frequent a place, it’s a good sign.

I picked up four pounds of frozen octopus, a whole pink snapper (about a pound and a half), and a pound of whole shrimp (heads and all) all for around $50. The prices were slightly lower than at Whole Foods, and I was also able to keep the head and bones of the snapper for stock. On a later trip, I was even able to get some conch, pictured below. (It was fresh and had a wonderful flavor, but I botched the recipe I tried by not properly tenderizing the meat beforehand.)


My only reservations about Tom Robinson’s are 1) the place doesn’t exude the kind of cleanliness I like to see in a fish market, and 2) on a return trip, a little over a week after the first one, I saw a distinctive whole fish for sale that was very suspiciously like another from my previous visit. Still, the snapper we had was firm, fresh, and delicious, as were the shrimp, and the prices can’t be beat. Fred and I will be going back for more.

If you want to make a trip yourself, here’s the address. They don’t have a web site, so call them if you need more information.

Tom Robinson’s Seafood
207 Roberson St.
Carrboro, NC 27510-2349
(919) 942-1221‎

The Octo-Pie


For years, my reputation as a cook hinged on my pies. This was largely the result of my friends’ utter ignorance of the pie-making process. Not realizing that the phrase “easy as pie” had been coined for a reason, they were easy targets, impressed by the mere fact that I made my own crusts. I did what I could to reinforce the myth, pointing out that I rolled out my crusts on an old flour sack taken from my grandmother and regaling them with stories of summer blackberry picking. Other key points were quietly omitted, such as the fact that my crust recipe was lifted from the back of the Crisco can and that my grandfather said of my first blackberry pie, “That crust reminds me of the bottom of my boot!”

So it came as a bit of a surpise when, a few months into our marriage, I realized that I had never made a pie for Fred.

He was thrilled to know that I could actually make pies from scratch and immediately began to imagine the possibilities.

“Can you make rhubarb pie?” he asked.

“Oh yes, when it’s in season.”

“How about blueberry?”

“Of course. There’s also grape pie in the fall,” I added. “You use Concord grapes, and it tastes like a really good grape jam.”

Then Fred’s brain, straying into odd corners as it likes to do, began to explore other options.

“What about onion pie?” he said.

“Actually, yes. It’s like a quiche.”

“Fish pie?”

“Um, never tried it, but I could probably figure it out.”

Then Fred’s eyes lit up and his face erupted in a happy smile–a sure sign that a terrible, terrible pun was at hand.

“What about octo-pie?”

I sighed. “I’m sure I could figure that out too.”

With that, the spectre of the octo-pie began to haunt my culinary imagination. Surely there must be a way to make a savory pie using octopus, a delicacy we both enjoy. But the project stayed on the back burner until Fred’s most recent birthday.

Preparing for a small dinner party to celebrate, I began scouring my cookbooks for ideas. And when I pulled out my copy of Lidia’s Italy and flipped it open, there it was: Octo-pie.

The recipe is actually for a tiella, a dough made with semolina flour that tastes like a cross between a pie crust and cornbread. Lidia’s recipe includes other fillings if octopus is not your thing, but the octopus was delicious–firm, tender and richly complemented by the flavors of olives and garlic.* Even some of our timid dinner guests tried it and were pleased. And Fred was ecstatic to have a pun to eat on his birthday

*I’ll describe where I got hold of the octopus in a future post.

Nona Lisa’s Tiella and Filling with Octopus, Garlic and Oil (adapted from Lidia’s Italy by Lidia Matticchio Bastianich, pages 247 – 252)

Tiella Dough

1 pkg. (2 tsps.) dry yeast
1/4 c. warm water
1 1/2 c. all-purpose flour, plus more for handling the dough
1 1/2 c. semolina flour
1 tsp. coarse sea salt or kosher salt
1 1/2 tsp. sugar
3/4 c. cool water plus more if needed
3 tbsp. extra-virgin olive oil, plus more for the bowl

Dissolve yeast in warm water and let it sit for several minutes.

Put flours, salt, and sugar in the bowl of a food processor and run the machine for a few seconds to blend the dry ingredients.

Stir the active yeast together with the cool water and olive oil in a spouted measuring cup. With food processor running, pour all the liquid into the flours and continue processing for 30 seconds or so. A soft dough should gather on the blade and clean the sides of the bowl. If the sides are not clear, incorporate more flour, a tablespoon at a time, to stiffen the dough. If the dough is very stiff, work in more cool water in small amounts. (You can also use a heavy-duty electric mixer to form the dough or do it by hand.)

Turn out the dough onto a floured surface and knead by hand briefly to form a smooth round. Placed the dough in a lightly oiled bowl and cover with plastic wrap. Let rise in a warm place until doubled, about an hour. Deflate the dough when doubled, knead it briefly, and return to the bowl for a second rise. Dough can be refrigerated in an airtight container for up to a day at this point; deflate and knead it whenever it doubles. (It doubled only once in the 24 hours it sat in my refrigerator.)

Octopus Filling

4 lbs. frozen, cleaned octopus (tentacles about 1/2″ thick at thickest part)

2 bay leaves
1 lb. ripe plum tomatoes (4 tomatoes)
4 tbsp. extra virgin olive oil
1 1/2 tbsp. sliced garlic
2/3 c. Gaeta olives, pitted and cut in half (I could not find Gaeta olives and used Kalamata)
1/2 tsp. peperoncino flakes
1/2 tsp. coarse sea salt or kosher salt

2 tbsp. chopped fresh Italian parsley

Defrost the octopus, and put it in a big pot with several inches of water to cover. Add the bay leaves. Bring to a boil, and cook at a bubbling simmer for about 35 minutes, or until the octopus is tender but al dente. You should be able to pierce the flesh with a big meat fork but still feel a bit of resistance when you withdraw it. The skin of the octopus should still be largely intact–not broken and peeling off, which indicates overcooking. Let it cool in the cooking water, then drain well and cut it up into 3/4″ pieces.

Rinse, core, and seed the plum tomatoes, and cut into 1/2″ dice. Pour the olive oil into a big skillet, set it over medium heat, and stir in the garlic. Cook for a minute, until sizzling, then add the octopus pieces and toss them in the oil. Scatter the olives in the pan, and cook for a couple of minutes, stirring and tossing; sprinkle in the peperoncino. When the octopus is sizzling, toss in the diced tomatoes, and season with the salt.

Cook at the simmer, stirring frequently, for another 10 minutes or so, until the filling is dense and glistening, with no liquid left in the pan. Toss in the parsley, and cool the filling before assembling the tiella.

Assembly and Baking

Heat oven to 375. Arrange a rack in the center of the oven and put a baking stone on it, if you have one. Brush the bottom and sides of a 12″ oven-proof skillet, baking pan, or tiella pan lightly with olive oil.

Deflate the dough, knead it briefly to form a round again, and cut off a third of the dough for the top crust of the tiella. The larger, two-thirds piece will be the bottom crust. Let the dough relax (especially if it has been chilled) before rolling.

On a floured surface, roll out the big piece of dough to a 14″ round. Transfer the round to the skillet or baking pan, centered and lying flat on the bottom and sides. Trim the top edge of the dough neatly so it is an even height, about 1 1/2″, up the sides all around.

Scrape the cooled filling into the bottom crust, and spread it in an even layer, slightly compressed. The bottom crust should extend at least 1/2″ above the filling all around.

Roll out the smaller piece of dough to a 12″ round and trim it into a neat circle that is a bit larger than the layer of filling–use a ruler to get the right dimensions. Center the circle and lay it on top of the filling. Pinch together the overlapping edges of the bottom and top crusts all around. Fold this flap of dough inward and press it down and against the pan sides all around. Make uniform indentations with your fingertips, to seal the tiella tightly and create a decorative rim of dough at the same time.

With the tip of a sharp knife, pierce the top crust all over with a dozen or so small slits. Finally, brush extra virgin olive oil all over the tiella, including the border of the crust.

Bake the tiella, on the heated stone if you have one, for about 45 minutes, or until the crust is a deep golden brown. Cool it on a rack for at least an hour in the skillet. Invert and remove the tiella if you want, or leave it in the pan for serving. Cut wedges and serve slightly warm or at room temperature. (It is also good hot.)